Sirocco fans are made by Caframo, a Canadian manufacturer known for marine fans. They suit caravan and RV use because they are compact, adjustable, quiet and low draw.
The Sirocco II has a 360 degree gimballed design, so you can direct airflow from one fixed mounting point. It also has three speeds and an inbuilt timer with 3, 6, 9 and 12 hour auto-off settings.
The Sirocco II is useful where airflow needs to be aimed at a bed, bunk, dinette or kitchen without taking up bench space. The folding body also lets it sit flatter against the wall while travelling.
Before choosing a position, check that the fan can swing through its useful range without hitting curtains, cupboard doors, bedding, reading lights or roof hatches.
2. Mounting ideas for RVs
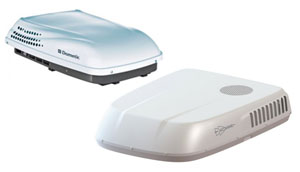
Every caravan, camper trailer and motorhome is different. A well placed 12V fan can be a practical alternative to a caravan air conditioner in mild weather, or a useful extra over the bed or dinette.
Hard mount the fan near a bed, bunk or dinette where airflow can be aimed at the person.
Fit a Merit or cigarette plug if you want the fan removable, provided the socket is fused and wired correctly.
Use pole clips on the base for camper trailers or annex use where a fixed wall mount is not practical.
Mount the fan to a small board for a portable bench-top setup, making sure it cannot tip over.
Use a retractable TV bracket only if it is strong enough and can be secured while travelling.
3. Wiring the Sirocco fan
The Sirocco II is a 12V/24V DC fan. In most caravans it will be connected to the 12V house battery system. The supplied lead runs through the mounting base and connects to the fan base screws: positive to positive, negative to negative.
Use a fused circuit. Connect to an existing suitable 12V accessory circuit, or add an inline fuse close to the supply.
Keep polarity correct. Positive goes to the positive fan terminal and negative goes to the negative fan terminal.
Protect the cable path. Route the cable where it cannot rub on sharp metal, be pinched by hinges, or sit behind mounting screws.
Switching is optional. The fan has its own speed and timer controls, but some installs also use a wall switch to isolate the circuit.
USB is not suitable. Standard USB outlets are 5V and will not run a 12V fan unless a proper DC-DC converter is used.
If you are not confident identifying a fused 12V supply and negative return, use an auto electrician. Mounting the fan is simple; choosing the right circuit is the important part.
Portable plug option
If you have a 12V socket close to the mounting point, a Merit or cigarette plug can make the fan removable. Use a plug rated for 12V DC, connect positive to the centre pin and negative to the outer contact, and confirm the socket is fused. Leave enough cable slack for the fan to swivel, but not so much that the lead can catch on bedding or cupboard doors.
4. Mounting the fan
Installing a Sirocco 12V fan is usually quick once the wiring point and mounting position are confirmed.
Pick a solid mounting spot. A reinforced panel, cupboard side or timber backing is better than thin lining board.
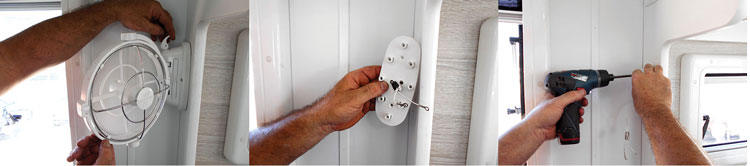
Remove the fan from the base plate and feed the 12V wiring through the centre of the base.
Connect the positive and negative wires to the fan base screws, checking polarity before final fitting.
Fasten the base plate to the wall or roof with six screws. Check behind the panel first so screws do not hit hidden wiring or plumbing.
Slide the fan back onto the base plate and secure it with the two locking bolts.
Test all three speeds and the timer before packing tools away.
5. 12V fans for camper trailers
Camper trailers need a different mounting plan from caravans because canvas walls, folding roofs and limited hard panels can leave few fixed mounting points. Decide whether the fan will be permanently mounted to a solid panel or used as a removable fan on a suitable pole or stable base.
Check the packed position. The fan, bracket and cable must clear the roof, canvas, bedding and furniture when the camper is folded for travel.
Use a solid mounting point. Do not screw into canvas or thin lining. For a pole mount, use clips that match the pole diameter and confirm they hold the fan securely against slipping or rotation.
Plan the 12V lead. Use a fused socket or circuit, protect the cable from sharp frame edges and hinges, and leave only enough slack for the fan to move through its useful range.
Keep portable setups stable. A board or bench-top base must not tip when the fan changes angle or speed.
Secure it before towing. Remove a portable fan or lock the mounted fan flat so it cannot swing into canvas, windows or stored gear.
Before the first trip, test the fan in both its operating and packed positions. This catches clearance and cable-routing problems before the roof or canvas is folded down.