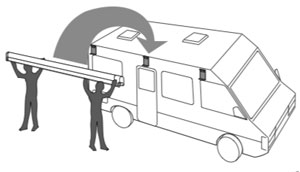
This guide walks through the basic installation sequence for a Carefree rollout awning. Always read the product manual before installing or using the awning. The manual has the model-specific safety warnings, measurements and hardware details that must take priority.
Do not remove tape, safety pins, travel straps or spring-tension restraints until the instructions say to. Awning roller springs can hold stored tension and can cause injury or damage if released too early.
General awning configuration
1. Before installing
Confirm the awning size, arm position and mounting height before drilling.
Check the wall structure and make sure upper and lower brackets will fasten into suitable support.
Keep the awning rail level and parallel with the floor line of the vehicle.
Seal all wall and rail fasteners to prevent water entry.
Have at least two extra people ready when sliding the awning fabric and arms into position.
2. Install the awning rail
Position the awning rail along the roof line, or at least 6 inches above the top edge of any door or window the awning will cover.
After confirming the mounting position, mark it with a chalk line.
Seal the back of the rail with silicone sealant or putty tape.
Align the rail on the wall and secure it with #10 x 3/4 inch screws, using all attachment holes.
Use a screwdriver to spread open the left end of the awning rail on the installation side.
File sharp edges or burrs from the rail end so the fabric is not damaged during installation.
Spray inside the awning rail track with silicone lubricant.
3. Assemble the awning
Do not remove the canopy tape, roller tube safety pin, or nylon strap holding the roll bar brake lever until instructed. Removing these too early may cause injury, awning damage or incorrect operation.
Assemble the awning on a flat surface
On a flat surface, lay out the arms and roll bar assembly. Position the roll bar with the fabric oriented over the top and the edge toward the coach.
Check the brake lever is on the right side. For Spirit and Fiesta awnings, the right arm assembly has the remote lock.
Slide the left arm into the left end plug of the roll bar. Align the holes and secure it using one 1/4-20 x 7/16 Quadrex drive screw.
Hook the remote lock over the brake lever while sliding the right arm into the right end plug. Align the holes and secure it with the matching screw.
Measure and confirm the awning width from arm centreline to arm centreline.
Tip: release the travel lock and slide the remote lock up until it protrudes over the arm. Hook the remote over the brake lever, then allow the remote lock to slide back into the channel while sliding the arm into the end plug. Close the travel lock when done.
4. Mount the bottom brackets
On the awning rail, mark the centreline positions of the arms. Check the arms will not interfere with lights, vents, windows or other fittings.
Using a non-permanent mark such as a chalk line, mark a perpendicular line from the awning rail down to the floor line.
Position the bottom mounting brackets centred on those lines. They must attach to the structure at the vehicle floor line.
Attach the bottom brackets using 1/4 x 2-1/2 inch lag screws, or the hardware specified in the manual.
Locating the bottom mounting bracket
The bracket is made to straddle trim at the floor line. A flat shim is available for mounting to flat areas without trim.
5. Mount the awning
Measure the distance from the awning rail to the bottom mounting brackets.
Adjust the arm length so the distance from the centre of the roller to the foot is approximately equal to that measurement.
Remove the tape from the canopy and unwrap only a small portion of canopy, not more than one wrap.
With helpers supporting the arms, slide the polycord edge of the canopy or Alumaguard into the awning rail.
Continue walking the arms and canopy down the rail until the arms align with the marked centre lines.
Lift each arm and secure the foot into the bottom bracket.
Firmly hold the roll bar, remove the safety cotter pin from the left end, and allow the fabric to roll up slowly.
Remove the nylon strap holding the brake lever.
Open the awning 12 to 18 inches to access the upper mounting brackets.
Loosen the upper brace locking knob, slide the upper bracket into position, centre it on the arm line, and fasten it into vehicle structure.
Extend arm to match required heightCarefully open awning to mount top bracket
Use care when removing the cotter pin. The pin is holding pre-wound spring tension. Securely hold the roller tube so it cannot rapidly roll up.
6. Stop bolt, fabric and bumpers
After the awning is mounted, complete the travel-position and fabric-retention steps from the manual.
Retract the awning and check whether the roll bar centreline is level with or slightly higher than the awning rail centreline.
Adjust the arm length if required.
Mark and install the stop bolt through the correct stop hole using the specified screw, washer, centring spacer and cap nut.
Roll the awning in and out several times to confirm the fabric is square on the roll bar.
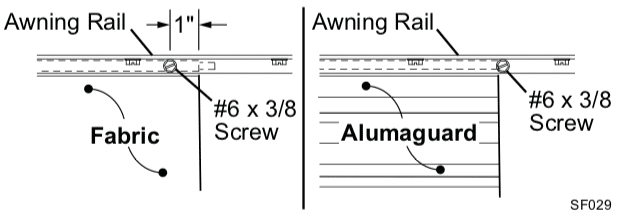
Secure the canopy fabric or Alumaguard using the specified #6 x 3/8 inch hex head screw at both sides of the awning.
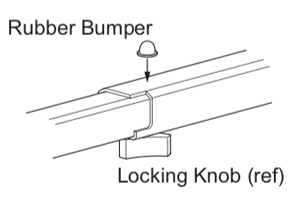
Fit the rubber bumpers if needed to tighten the awning arms in the stored travel position.
Installing the stop boltSecuring the awning fabricInstalling the rubber bumpers